Transformation Tuesday: Gallery Wall

Josh’s home has a large, “Plain Jane” wall leading upstairs.  One day I decided I couldn’t take the “Plain Jane” wall anymore and decided to make a Gallery Wall.  Lucky for me I already had a ridiculous amount of black picture frames from when I moved from my apartment to his house.

**TIP: DO NOT pay full price for frames.  Try places like TJMaxx, Marshalls, or better yet Ross.  Frames that I would have easily paid $20-30 dollars for, I paid $6-$12 at the above mentioned stores.  Also, the Dollar Store sells picture frames that are easy to spray paint to the desired color.

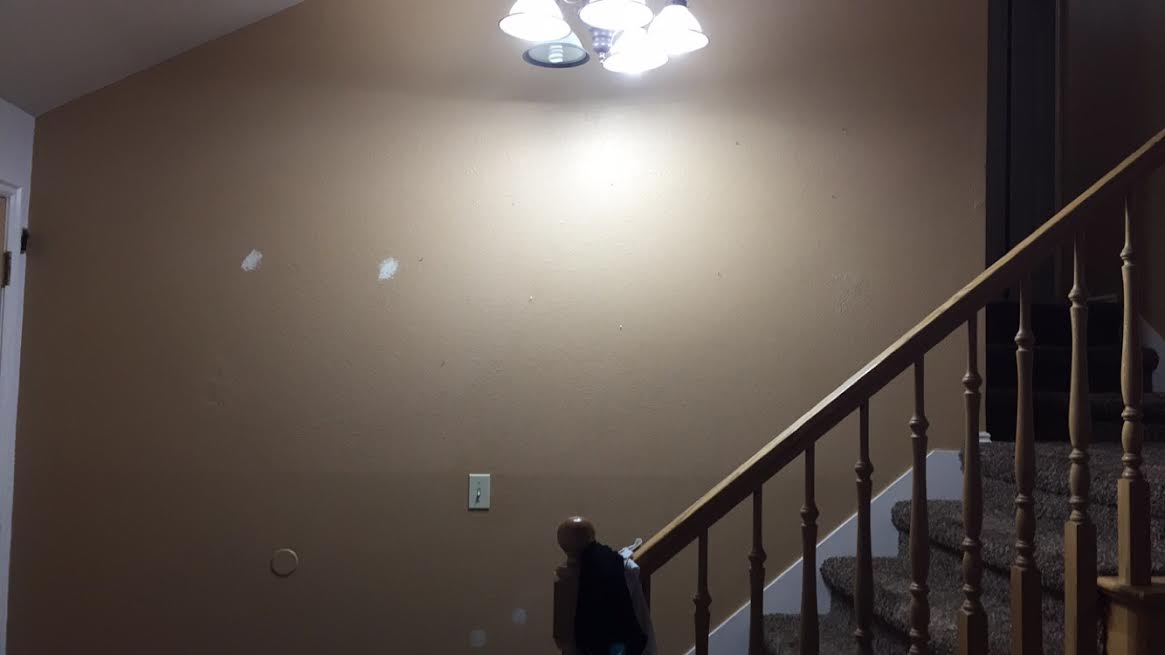
Before.  There are few patched holes that I simply covered with picture frames… Sometimes I’m cheap but clever.  🙂

5c80b38f-106d-4753-bf6b-860bb4ef5832

All I needed to do was print out some pictures.  I used Walgreen’s as I always tend to find a pretty good coupons for 1 hour photos.  And I also wanted to add a few quotes and a monogram letter.

There are a LOT of ways you can do a Gallery Wall.  You can make it super symmetrical, use different colors and sizes of frames, maybe don’t use frames at all.  I preferred my frames at different measurements, no exact formula, and different sizes of frames.  This made for easy hanging as I didn’t measure any type of space between frames.

**TIP: There are a lot of templates online or at stores to help create perfect spacing in between pictures.  I’ve found templates on Pinterest, Michael’s, & Hobby Lobby.**

After.  This little Gallery Wall added just the right amount of decoration.  Since this picture was taken, we’ve added a few more pictures.  Once you have the hang of it, the possibilities are endless.

df30ad72-0801-4a2a-bd6b-4ef1b17fd94e

Shrimp & Veggie Alfredo

I love shrimp!  Add in some veggies, pasta and Alfredo sauce and you’ve got a pretty amazing dinner.  This meal has little prep needed and cooks fairly quickly.

Shrimp and Veggie Alfredo


Grocery List: Prices Vary

  • 24oz Package of Frozen Shrimp (Cooked, Peeled, Deveined)
  • Half Bag of Frozen Broccoli
  • 1-2 Cups Fresh Mushrooms (I slice them pretty thin)
  • 1 Jar Alfredo Sauce
  • 1/2 Package of Bow Tie Pasta (I use half to keep down my carb intake)
  • Spices: Pepper, Salt, Italian Spice Mix, Garlic Salt
  • 1-2 Tblsp. Butter


Let’s Cook!

  • Over medium heat, in a large skillet, add 1 tablespoon butter and shrimp and broccoli
    • TIP: Because both shrimp and broccoli are frozen, you’ll want to start cooking them first.
  • In a large pot, boil water for pasta. Cook pasta al dente, strain and put to the side.
    • TIP: Add some EVOO to the water so that the pasta doesn’t stick
  • Once shrimp and broccoli are tender, add seasonings and mushrooms.  Place a lid on the skillet to steam all of the yumminess together. About 10 minutes
  • Turn heat to low and add Alfredo sauce & strained bowtie pasta
    • TIP: If the skillet is too hot, the sauce will splatter… be warned
  • Keep on low for a few minutes to let all ingredients heat up and mix together
  • Add a little more of each seasoning to get a full flavored meal

Peppermint Bark

Literally, the easiest treat I’ve ever made: Peppermint Bark

Grocery List $5-$10
Dark Chocolate Baking Chips
White Chocolate Baking Chips
Candy Canes or Peppermints (I used candy canes as I didn’t want to unwrap a bunch of peppermints)

Let’s Prep
1. Line a 9×13 baking dish with parchment paper
2. Unwrap candy canes (or peppermints) and place in a durable zip lock bag – smash with a rolling pin, hammer, or meat tenderizer. I left a few chunks big but mostly you want the candy canes fully smashed. **If you are having a bad day, this project might help you feel better. 😉

Let’s Bake
1. Heat up Dark Chocolate Baking Chips in a microwaveable bowl. **Microwave until you can stir at a smooth consistency
2. Pour & Smooth dark chocolate into the baking dish – make sure to spread until smooth
3. Heat up White Chocolate Baking Chips in a microwaveable bowl. **Microwave until you can stir at a smooth consistency
4. Pour & smooth white chocolate on top of dark chocolate – make sure to spread until smooth
TIP: Try to make both dark chocolate & white chocolate the same width
5. Sprinkle smashed up peppermints all over the top of the white chocolate
6. Refrigerate for 1.5-2 hours.
7. Once completely hardened you can slice up or break into pieces and serve.
8. ENJOY!


Cait's Peppermint Bark

Strugglin’ to Lose?… KEEP GOING!

Ladies & gents, I’ve struggled with my weight since right after High School and living on my own. I no longer had my mom supervising my fast food intake or ensuring I ate 3 square meals a day. I went a little bonkers and decided I could live off of McDonald’s. It was a sad, sad day for my waist line (and my health).

Well, that was a long time ago and although I’ve cut out the McDonald’s (and fast food in general), I still struggle to keep off the weight. But over the years I’ve learned that dieting just doesn’t work for me, a lifestyle change does. You’ll notice I always put “diet” in quotation marks because I don’t want you to “diet”, I want you to lifestyle change. So in my blog “diet” = lifestyle change. 🙂

These are a few tips of mine to encourage you to KEEP GOING!

#1: Being consistent is where it’s at. If you decide to “diet” for 1-2 weeks but don’t see the results you want, give up, throw in the towel, and begin eating unhealthy foods AND stop exercising, guess freakin’ what…. you aren’t going to make any progress. Even on days/weeks where you only lose .5 pounds, you’ve got to keep going. Especially if you are a woman, we HOLD onto weight like no other and it takes time, dedication, and consistency. Don’t give up on yourself, you are worth it!

#2: Stay positive. This coincides with tip #1. If you are constantly down on yourself and stressing yourself out about your weight, you aren’t going to get very far. Be proud & happy with yourself for every inch or pound lost. Remember, your body is under construction… it will take time.

#3: Set goals. Now, if you are like me and have a goal of losing 50 pounds, don’t make that your starting goal! Setting such a high goal at one time can be majorly overwhelming. Set a goal for your first 2-3 months of your “diet”. It can be a small goal or large goal but remember to make them. And that leads me to tip #4.

#4: Reward yourself! If you hit your first 2-3 month goal reward yourself!!! I don’t encourage rewarding yourself with bad food as this can sometimes result in backpedaling and spin you out of control. But instead I encourage you to get your nails done, buy a new article of clothing, get your hair done. Do something that will make you feel really good.

#5: Remember how beautiful you are inside and out. No matter your size, shape, color, WE are all BEAUTIFUL! Always remember that and stay true to yourself. Don’t “diet” for a man, work, etc. “Diet” for yourself b/c your health is worth it. <3 xoxo

(Mini) Chicken Pot Pies

I can honestly say these are the EASIEST to make and YUMMIEST to eat!  My boyfriend could seriously eat these every day but b/c I try to eat clean as much as possible I don’t make them very often.  Well, last night was date night at home so I made him his favorite meal.  Hope you & your loved ones enjoy them too!

Grocery List $6-$10
**Most of these ingredients I have lying around my house at all times; prices may vary**
3 Chicken Tenders
1 Can Cream of Chicken Soup
1/2 Cup Frozen Peas
1/2 Cup Frozen Corn
1 Package *Low Calorie* Crescent Rolls (makes 8 pot pies)
Spices (your preference)

Let’s Cook
Cook chicken and shred
In a separate bowl, add shredded chicken, veggies, cream of chicken and spices – mix thoroughly. Set Aside.
PAM your muffin tin (you don’t want these babies to stick!)
Tear crescent rolls at preferrated lines and place one in each muffin cup.
Tip: I stretch the crescent rolls just slightly, and careful to not rip them, so that they cover more of the muffin cup.
Add mixture to each muffin cup
Close up the top of your pot pie by using the sides of the crescent roll (there should be 3 corners to cover the top)
Tip: Take a fork and stab each one so that air can seep through and your pot pies don’t explode)
Bake at 375 degrees for 9-12 minutes
Tip: Scoop the pot pies out with a fork or spoon. If you try lifting from the top most likely the top of the pot pie will come off.


Mini chicken Pot Pies