Cauliflower Mash

My first attempt at Cauliflower Mash and it was actually really freakin’ good!  I read a lot of different recipes but when it came down to it, I just used the same ingredients I would have in mashed potatoes.  One thing I would do differently next time is let the cauliflower sit in a strainer over a bowl just to get all the extra water out.  Other than that, this cauliflower mash was amazing.

Grocery List: 

  • 1 Medium Head of Cauliflower
  • 1 tbsp. Butter
  • Pinch of Cheese
  • Salt & Pepper to taste
    • I use a garlic salt to add more flavor

Let’s Cook!

  • Separate the cauliflower into florets and chop core finely
  • Put cauliflower into a pot, cover with water & boil for about 15 minutes or until cauliflower is very tender.
  • Once cauliflower is done, put to the side in a strainer (over a bowl) to get all excess water out.
  • In a separate bowl, add milk & cheese
  • Add cauliflower, mash generously
  • Add Salt & pepper to taste
    • Actually taste your mash to see if it needs more butter, cheese, S&P before serving it
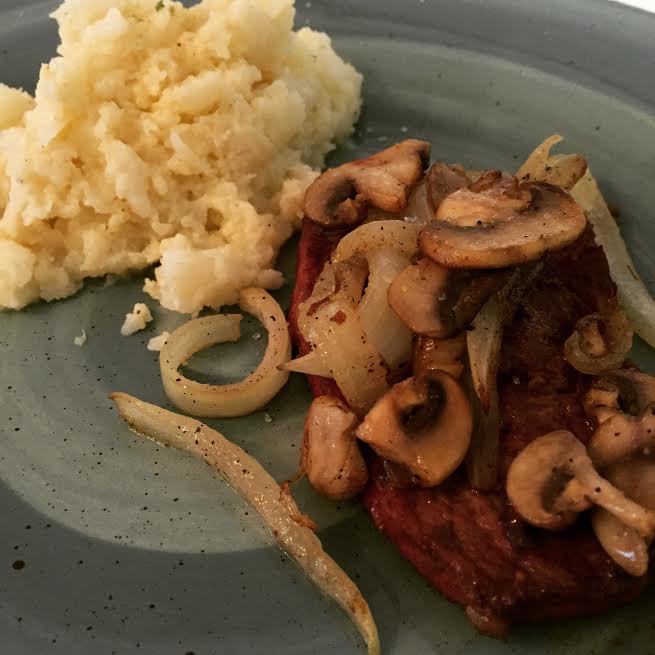
    • Paired mine with a yummy steak topped with mushrooms & onions.  Together this made for a healthy and scrumptious dinner.

Cauliflower Mash


Create Your Own Monogram Letter

7fb7d099-bc61-48d9-af69-099f4b46bec7


In my DIY Gallery Wall blog, I talked about added a monogram letter.  Monogram letters can be really pricey so I decided to craft one up for my gallery wall.  Here in Utah, we have this cool store, The Wood Connection.  They sell all different heights, sizes, etc. of wood monogram letters.  Recently I’ve also found wood monogram letters at Target or Michael’s.  Below are the instruction on how to make an affordable, cute monogram letter for any occasion.


Supplies

  • Monogram Letter (Pictured below: Target, $3)
  • High Gloss Craft Paint (I used Martha Stewart)
  • Thick Scrapbook Paper – Color / Pattern of your choice
  • Permanent Glue Runner or Glue Dots (this makes your life easy!)
  • Heavy Duty Detail Knife (I have a set of these I found at Ross for a steal, but here is a Fiskars Brand)

Let’s Craft!

  • Paint your monogram letter, completely.  I usually do 2-3 coats.
  • Let dry completely.
  • Use Glue Dots / Glue runner on the front of your monogram letter.
  • Stick thick scrapbook paper to the letter. Press down so that it adheres
  • Use your detail knife to cut around the edges.

Tips

  • You can trace your monogram letter out on paper, then cut out and adhere if that is easier for you.
  • Use a small ink pad to give the edges of paper some color.
  • Add a small wall hanger on the back to hang on the wall or use command strips if you can’t nail into your wall.

df30ad72-0801-4a2a-bd6b-4ef1b17fd94e

Transformation Tuesday: 1960’s Dresser

I moved into my Fiance’s home and he had a lot of hand me down furniture.  And I was like “We are soooo buying new furniture” in my bratty voice.  And then I actually looked at the prices of new furniture and I was like “We are soooo NOT buying new furniture” in my OOPS I was wrong voice.  Instead, I decided to revamp some of his old pieces to match my current pieces.  I went for a beach theme in our bedroom as the Florida girl in me feels most at peace at the beach.

From Drab to Fab!Dresser Makeover

I’m admitting now that I’m not a professional DIY-er.  And honestly I kind of just do my own thing and see how it goes.  Luckily this dresser turned out stylish and super functional.  It’s made a great piece in our bedroom.

How I updated this 1960’s Dresser:

  1. Sand the crap out of the entire thing (legs, drawers, etc)
  2. Painted with a flat Beyer Paint & Primer.  I only did one coat, but touched up spots that needed a little more love
  3. Let dry for 24 hours +
  4. Add new hardware if desired.  I got the new knobs at Home Depot for like $1.20/piece
  5. Put your stuff in it and admire your work!

Wellness Wednesday: Protein Bites

This easy recipe is for all the people trying to stay on track with their health goals.  And if you are like me, maybe you are trying on wedding dresses this weekend and need to stay focused but also need yummy protein treats!  This recipe is made with natural ingredients that are sure to satisfy you.  But be warned, they taste like cookie dough bites and can be addicting… 1, 2 tops, are all you need to satisfy your protein craving / sweet tooth.

Let’s Prep

  • In a large mixing bowl, mix the below ingredients together
    • 1 Cup Oats
    • 1/2 Cup Natural Peanut Butter (I use crunchy b/c I love crunchy PB)
    • 1/3 Cup Honey
    • 1/2 Cup Chocolate Chips
    • 1 Tsp. Vanilla
  • Line baking sheet with parchment paper

Let’s Bake (I mean, refrigerate)

  • Wet hands with cold water (this is so the ingredients don’t stick to your hands)
  • Roll into 1 – 2 inch balls
  • Place balls onto parchment paper
  • Refrigerate for at least 1/2 hour
  • Enjoy!

05c34be8-b98d-4da3-b440-40752ab4c9c7

Happiness is a Slice of Pizza!

Oh pizza!  It’s my weakness.  When I started my weight-loss journey a few years back I realized I’d have to cut out pizza.  I cried myself to sleep that night.  After about a month of depriving myself of delicious pizza, I caved.  I decided to make a pizza myself, with fresh ingredients.  The result, AH-MAZING!  It’s quick, easy, and tasty.

Pictured below are a Chicken, Alfredo, Spinach Pizza and the other an Italian Meat Pizza.  Try it on the grill – makes for a great tasting pizza!

Grocery List: Price Varies

  • Pillsbury Thin Crust or Whole Wheat Crust (Yes, I cheat and don’t make my dough from scratch)
  • Sauce: Alfredo, Olive Oil, Marinara, etc.
  • Toppings: Chicken, Bacon, Veggies, Pepperoni, etc.
  • Cheeses (I use a blend of whatever I have on hand)

Let’s Cook!

  • Follow directions on Pillsbury Crust container
  • Add light sauce
  • Add toppings
  • Add Cheese
  • Bake

1525711_505532329599794_5210773468274773592_n

047